
How to install Basehim on your hosting
To install Basehim, you upload its files to your hosting, create an empty database in your control panel, then open your site and answer four short screens. It takes about five minutes. Everything is done in a browser and your hosting control panel.
What your hosting needs
| Needed | Where to check | |
|---|---|---|
| PHP | 8.1 or newer (8.2 or 8.3 is best) | cPanel: Select PHP Version or MultiPHP Manager |
| Database | MySQL 5.7 or MariaDB 10.3, or newer | included with almost every plan |
| Web server | Apache or LiteSpeed | the usual on shared hosting |
| Space | about 30 MB, plus your images | your plan's disk space |
Most hosting plans with cPanel, Plesk or DirectAdmin meet these requirements. The full list, including PHP extensions, is on the Download page. You don't have to check it yourself: the installer's first screen does, and tells you how to fix anything that's missing.
Turn on HTTPS first. If your site doesn't show a padlock yet, switch on your host's free certificate before you install (cPanel: SSL/TLS Status → Run AutoSSL), and open your site with
https://. The installer saves the address you use, and it is not yet something you can change in the dashboard.
Step 1: Upload Basehim to your hosting
- Download basehim.zip (about 2 MB). The Download page always has the newest version.
- Sign in to your hosting control panel and open File Manager. Go to your website's folder, usually public_html.
- Upload basehim.zip into that folder. Then select it and choose Extract. This makes a folder called basehim.
- Open the basehim folder, choose Select all, then Move everything up into public_html. Delete the empty basehim folder and basehim.zip afterwards.
Can't see a file called .htaccess? It is a hidden file, and it must be in public_html next to index.php, or every page except the home page says "not found". In cPanel's File Manager, open Settings and tick Show Hidden Files to see it.
Step 2: Create a database
Basehim keeps your posts, pages and settings in a database. Your hosting includes them; you only need to create an empty one.
- In cPanel, open MySQL Database Wizard. In Plesk, open Databases → Add Database; in DirectAdmin, MySQL Management → Create new database.
- Type a name for the database, such as basehim.
- Create a database user with a strong password. Keep the password: you will type it in the next step.
- Give the user All Privileges on the database.
- Write down the database name and user name exactly as the control panel shows them. Many hosts add your account name in front, so basehim becomes something like cpaneluser_basehim.
Step 3: Run the installer
Open your website's address in your browser. Basehim notices that it isn't installed yet and opens the installer. It has four screens, works on a phone as well as a computer, and checks what you type before it moves on. These screenshots are from Basehim 1.2.98.
1. Check your server
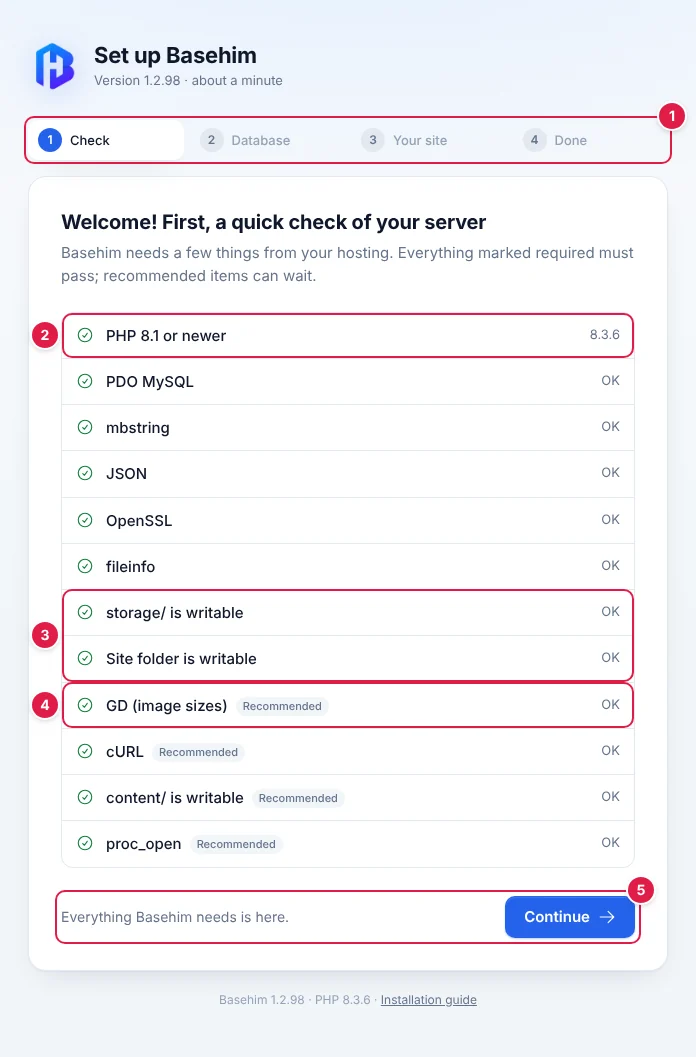
- The four screens. A tick replaces the number of each one you have finished.
- The PHP version, followed by the extensions Basehim needs.
- Basehim needs to be able to save files in its folders. If one of these fails, set the folder's permissions to 755 in File Manager, or ask your host.
- Recommended items never block the install. A missing one turns amber and says what it is for.
- Continue, once every required item passes.
A required item that fails turns red with the fix underneath, for example where to choose a PHP version in your control panel, and the button becomes Check again. Fix it, then check again.
2. Connect your database
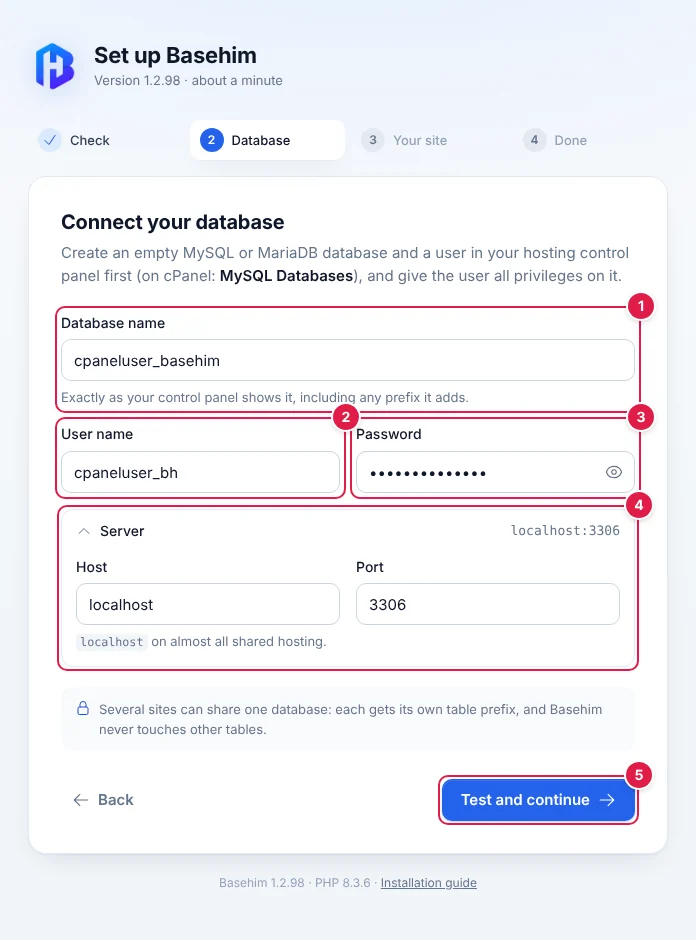
- Database name exactly as your control panel shows it, including the account name it adds in front (here cpaneluser_). The database must already exist; it can be empty or shared with other sites.
- User name of the database user.
- Its password. The eye button shows what you typed.
- Server:
localhostand port3306, right on almost all shared hosting, so this is folded away. Open it only if your host gave you a different server name. - Test and continue connects and checks that the database server is new enough (MySQL 5.7 or MariaDB 10.3 or later) and that the user can create tables. Nothing is installed yet.
If the connection fails, you stay on this screen, with what went wrong at the top:
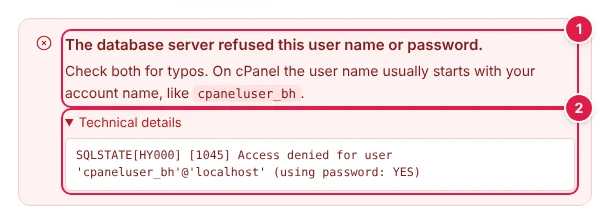
- What went wrong, in plain words, and what to check. Refused this user name or password: a typo in either. Can't open a database called …: check the name and its prefix, or give the user access (cPanel: MySQL Databases → Add User To Database, then All Privileges). No database server answered: check the host and port.
- Technical details: the database server's own message, useful if you ask your host for help.
What you typed stays in the form, so fix the field that is wrong and try again.
3. Your site and account
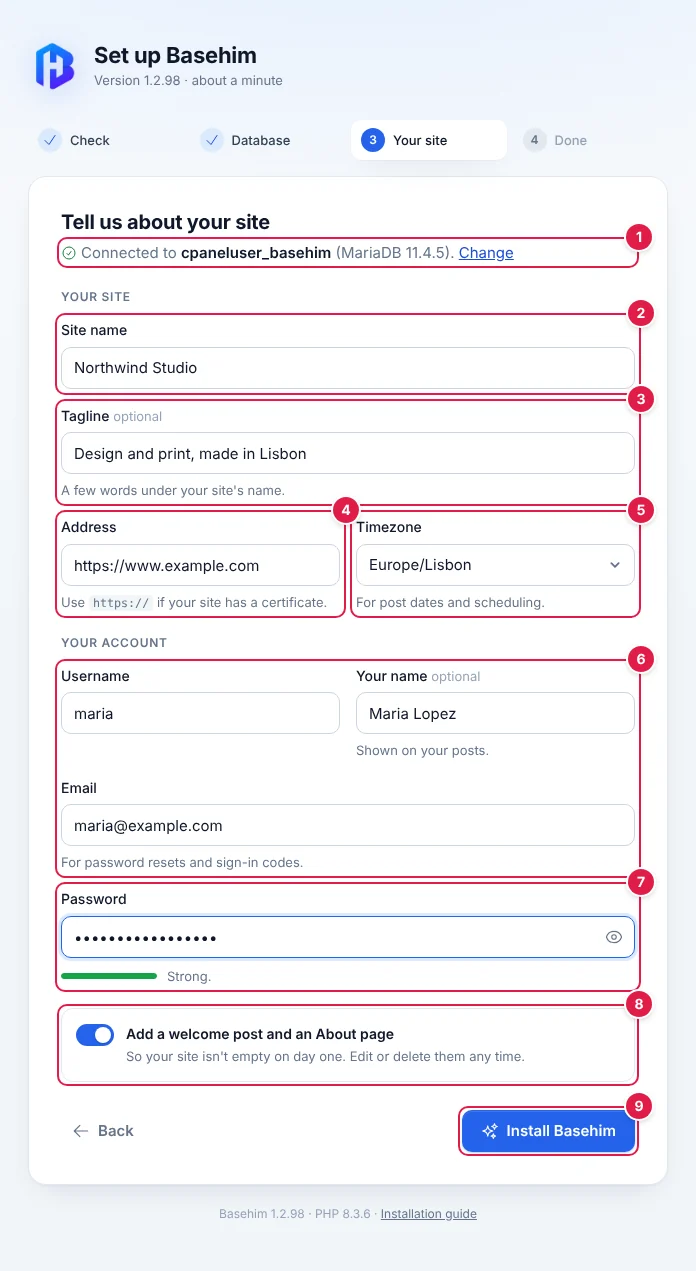
- The database you connected to, with its server version. Change goes back a step.
- Site name: shown in your site's header, the admin and the sign-in page.
- Tagline, optional: a few words under the name. Leave it empty for none. You can change both later under Settings → General.
- Address: filled in from your browser's address bar, so it is right even behind Cloudflare. It starts with https:// if your site has a certificate.
- Timezone: chosen from your computer's, for post dates and scheduled posts.
- Your account: a username (3 to 60 letters, numbers, dots, dashes or underscores), the name shown on your posts, and your email, where password resets and sign-in codes go.
- Password: at least 8 characters and not your username. The bar is a guide to how strong it is.
- Starter content: a welcome post and an About page, so your site isn't empty on the first day. Turn it off to start with nothing.
- Install Basehim does the rest in one go.
Pressing Install Basehim sets everything up in one go: your site's tables in the database, your account with full control of the site, categories, a main menu with Home and About, and your settings.
If something goes wrong part-way, the problem is shown on this screen. Fix it and press the button again; nothing is left half-done. Your site's emails are sent from noreply@ your domain: see How to set up email.
4. Done
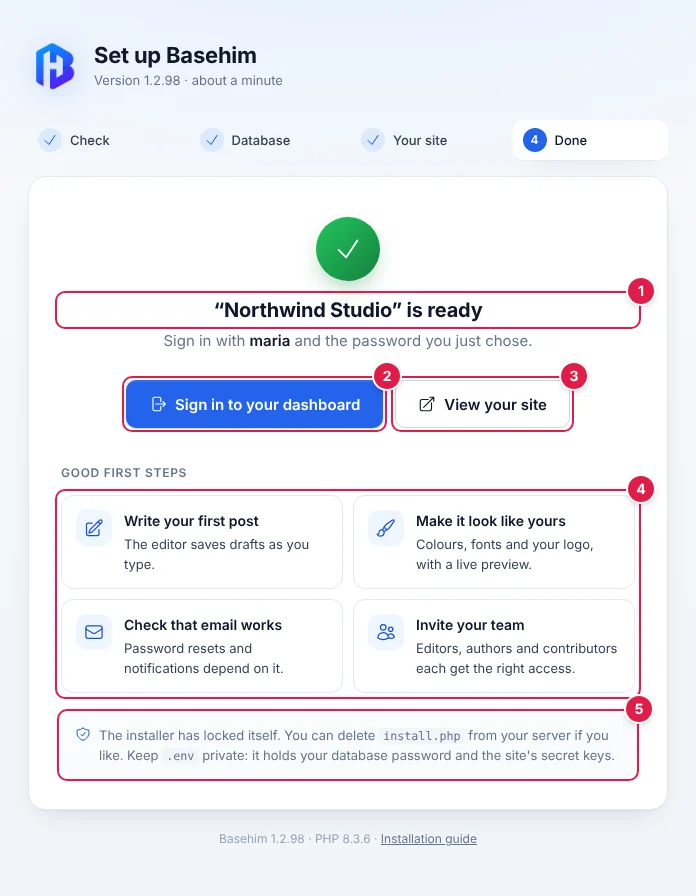
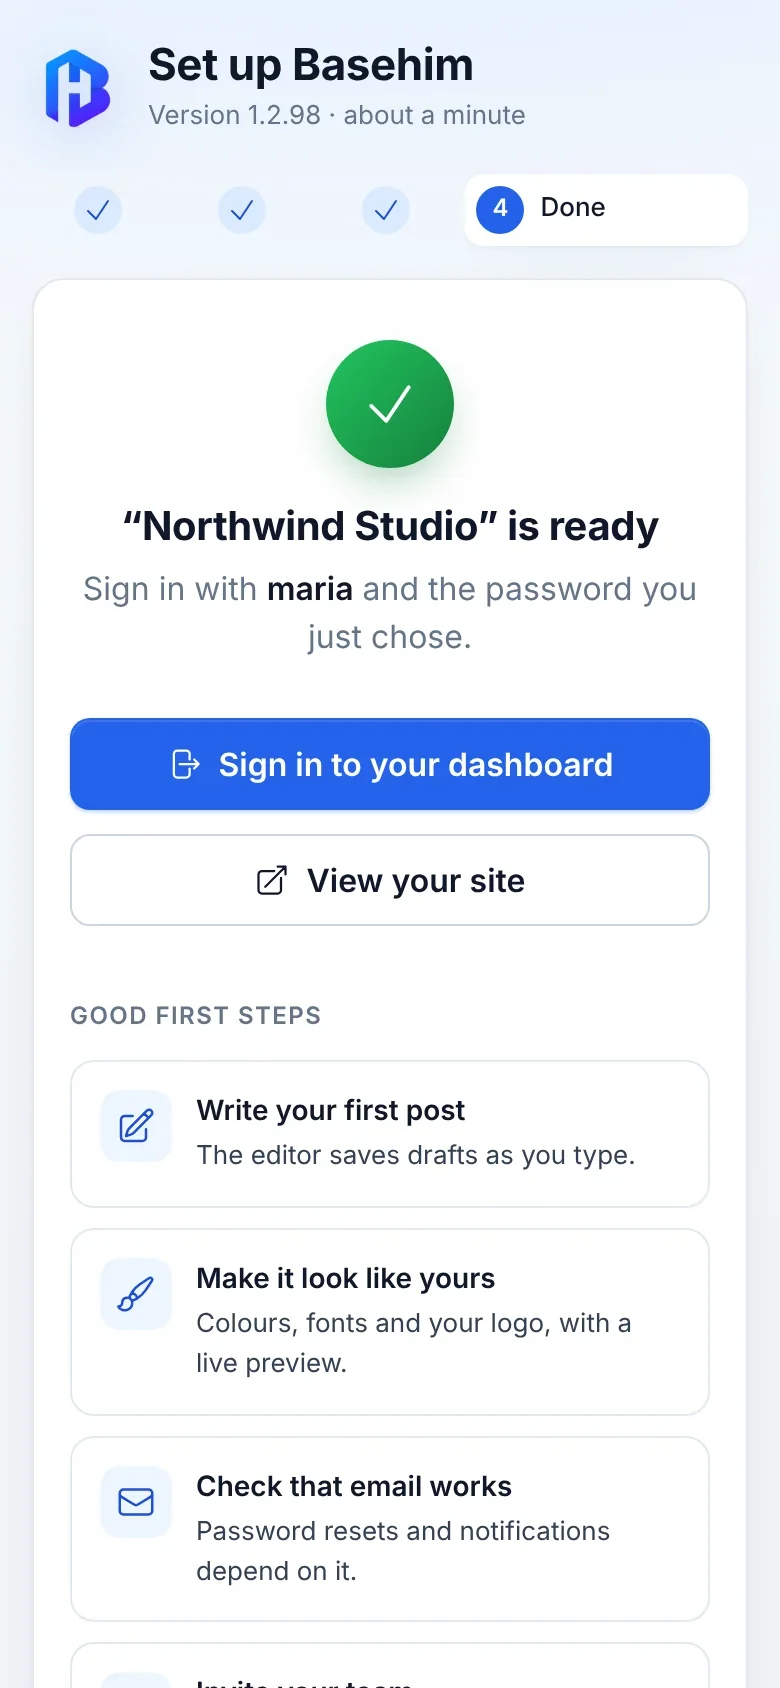
- Confirmation, with your site's name and the username to sign in with.
- Sign in to your dashboard.
- View your site, in a new tab.
- Good first steps: write a post, make the site look like yours, check that email works, and invite your team.
- The installer has locked itself, so nobody else can run it.
Only the browser that ran the install sees this screen, and only for half an hour. After that the installer stays locked.
Your new site
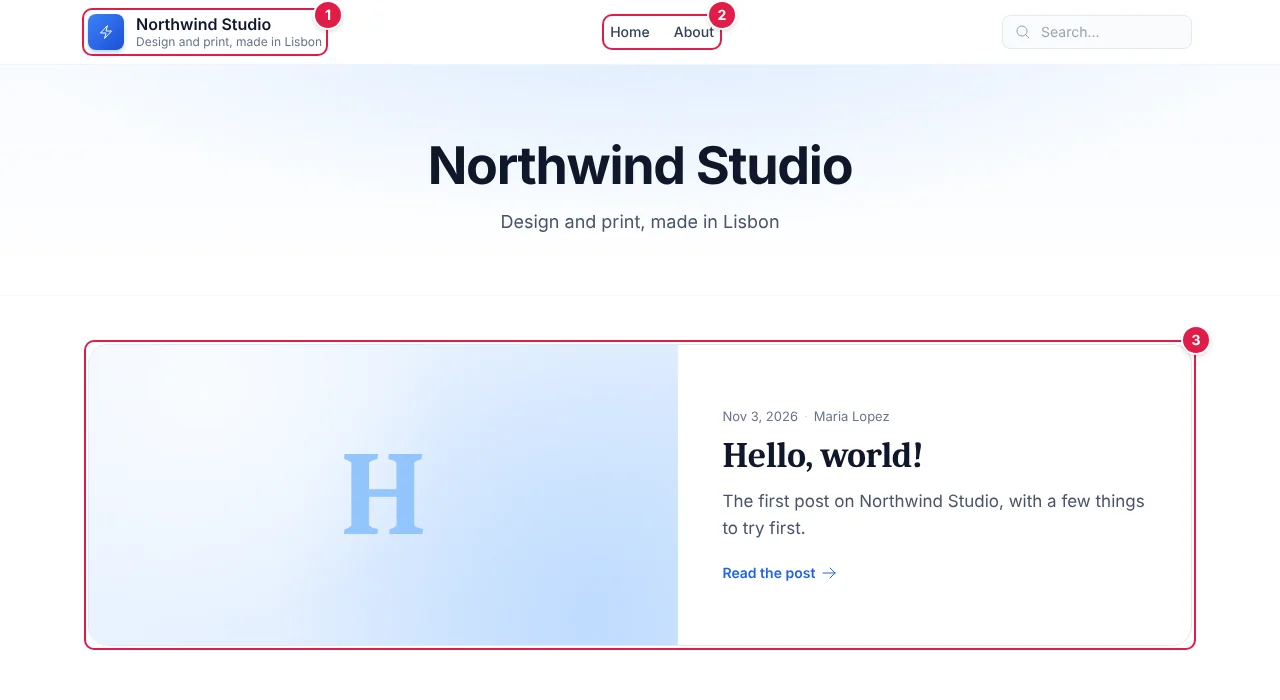
- The site name and tagline you entered.
- The main menu, Home and About. Change it under Appearance → Menus.
- The newest post leads the home page. Until a post has a featured image, it shows the first letter of its title.
Installing in a folder
Want your site at an address like example.com/blog? In Step 1, create a folder called blog inside public_html and move the files there instead. Then open example.com/blog. Nothing else changes.
Can several sites share one database?
Yes. Some hosting plans allow only a few databases. Each Basehim site keeps its own separate set of tables, so you can install several sites into the same database and they never touch each other. Enter the same database details in Step 3 for each one.
If something goes wrong
| What you see | What to do |
|---|---|
| Every page except the home page says "not found" | The hidden .htaccess file is missing. Turn on Show Hidden Files in File Manager and check it is in the same folder as index.php. If it is there, ask your host to switch on mod_rewrite. |
| The installer's button says Check again | Something your site needs is missing. The red row says how to fix it: see Check your server. |
| The database server refused this user name or password, Can't open a database called … or No database server answered | One of the database details is wrong. The message says which: see Connect your database. |
| The installer says a folder isn't writable | In File Manager, set the folder's permissions to 755 (never 777), then press Check again. If that doesn't help, ask your host to let the website write to its own folder. |
| Your site shows a padlock warning, or images and links start with http:// | The site was installed before HTTPS was on. Ask your host to change APP_URL in Basehim's .env file so it starts with https://. |
| A white page, or "Something went wrong" | Ask your host for the PHP error log of your site: it says what failed. |
| Images upload, but no smaller versions are made | Ask your host to turn on the PHP GD extension, then use Settings → Media → Regenerate thumbnails. |
Next
- Next: How to sign in and find your way around your dashboard.
- Set up email, so password resets and sign-in codes reach you.
Need more help?
Every step of running your site, in order, with screenshots.
Leave a comment